 Well, bathrooms are always good for stinky pictures, and this one is no exception. It's actually from a long time ago when I was still in NC working for someone else. I just found it on my pc, but I still did it... honest.
Showing posts with label Tilework. Show all posts
Showing posts with label Tilework. Show all posts
Sunday, May 24, 2009


Tuesday, October 14, 2008
This floor is what we tradesfolk call "cut-up". It means that it's not just one big room, but that it has lots of turns, doorways, etc. This one has ten doors, two different rooms, four hall sections and two closets. AND it's all done in a pattern. The pictures were taken before I gave it the final buff, so you may notice some haze.

 Here's the pattern. Both pictures are the same floor, just a different angle so you can see how the pattern works. Daltile calls it the "Hopscotch" pattern.
 It is grouted with a special grout that is stain-proof after curing five days. It is harder to install, and requires extra steps during installation. When you install normal grout, you squish it into the joints with a rubber grout float, then use a stiff sponge to spread it around and form the joints. This step also cleans off extra grout, leaving a haze. After it dries, you buff the now dry grout off the tops of the tiles.
Well, TEC XT grout always leaves the same haze, but in my experience, it doesn't buff off. So I come back again the next day, and mix one cup of vinegar to five gallons of water, and sponge it again. The acid in the vinegar breaks down the grout on the tile, making it come off easily. Then I have to sponge it again with clean water to get the vinegar off, because it will continue doing it's job if I leave it on. Extra step, but worth it for Antique White to stay Antique White, and you never have to seal it.


 These pictures represent two people, six days worth of labor:
Day 1, demo old floor, which includes three linoleum layers, two plywood layers, and we found out the subfloor is only 7/16" thick. Not strong enough for tile, even with concrete board. Remove doors, toilet and stove.
Day 2, install 1/2" roof span rated 5 ply plywood, glued and nailed down to sure up the floor.
Day 3, install 1/4" concrete board, polymer modifed thinset to floor and nailed.
Day four, install all uncut tiles, leaving the cuts for later. This lets us do a cut up floor in two days because we can walk all over it the next day and install the cuts.
Day 5, install all the cut tiles, these are the ones against the wall, under the doors etc. Anywhere the tile runs into something.
Day 6, grout: Mix, install, sponge, buff, re-install toilet and stove.
Day 7, just me: Vinegar sponge, water sponge, re-install doors. And on the seventh day I rested as well.

 Here's the pattern. Both pictures are the same floor, just a different angle so you can see how the pattern works. Daltile calls it the "Hopscotch" pattern.
 It is grouted with a special grout that is stain-proof after curing five days. It is harder to install, and requires extra steps during installation. When you install normal grout, you squish it into the joints with a rubber grout float, then use a stiff sponge to spread it around and form the joints. This step also cleans off extra grout, leaving a haze. After it dries, you buff the now dry grout off the tops of the tiles.
Well, TEC XT grout always leaves the same haze, but in my experience, it doesn't buff off. So I come back again the next day, and mix one cup of vinegar to five gallons of water, and sponge it again. The acid in the vinegar breaks down the grout on the tile, making it come off easily. Then I have to sponge it again with clean water to get the vinegar off, because it will continue doing it's job if I leave it on. Extra step, but worth it for Antique White to stay Antique White, and you never have to seal it.


 These pictures represent two people, six days worth of labor:
Day 1, demo old floor, which includes three linoleum layers, two plywood layers, and we found out the subfloor is only 7/16" thick. Not strong enough for tile, even with concrete board. Remove doors, toilet and stove.
Day 2, install 1/2" roof span rated 5 ply plywood, glued and nailed down to sure up the floor.
Day 3, install 1/4" concrete board, polymer modifed thinset to floor and nailed.
Day four, install all uncut tiles, leaving the cuts for later. This lets us do a cut up floor in two days because we can walk all over it the next day and install the cuts.
Day 5, install all the cut tiles, these are the ones against the wall, under the doors etc. Anywhere the tile runs into something.
Day 6, grout: Mix, install, sponge, buff, re-install toilet and stove.
Day 7, just me: Vinegar sponge, water sponge, re-install doors. And on the seventh day I rested as well.
Thursday, June 26, 2008


Saturday, June 09, 2007
It seems I am dangerously close to becoming a tile man, and projects that challenge and give great job satisfaction make me not mind that so much. As you can see from some of the other projects, I enjoy detailed, custom projects. These were fun, and it's fun to have clients with such good taste in colors and products. (You know who you are). These three projects are all in the same house.

 The above is a fireplace surround. The 4X4 diagonals really make the hearth look interesting. Imagine the difference if it was just straight tile. Though the pictures don't really show it, the decorative nosing adds a nice touch as well. The surrounding cabinetry isn't finished yet. I will post an update when completed. I think the finished product will make us all drool!

 The diagonal 8X8s give the floor sort of a quilted look.
 Here's a doozie! The thing that makes tilework difficult is patterns, and how many cuts you have to make. I think this one has about 1 million cuts, and a step up and a step down to contend with. In addition to that, it's laid on top of existing tile, so I had to grind the glazing off the old tile with a diamond grinder so the new floor would stick. Worth all that sweat? I think so. (You would agree if you saw the old floor.)
 AHHHHH! Wood, how refreshing! This coatrack/hat&gloverack is on the wall above the previously pictured mudroom tile . It is much bigger than it looks.

 The above is a fireplace surround. The 4X4 diagonals really make the hearth look interesting. Imagine the difference if it was just straight tile. Though the pictures don't really show it, the decorative nosing adds a nice touch as well. The surrounding cabinetry isn't finished yet. I will post an update when completed. I think the finished product will make us all drool!
 The diagonal 8X8s give the floor sort of a quilted look.
 Here's a doozie! The thing that makes tilework difficult is patterns, and how many cuts you have to make. I think this one has about 1 million cuts, and a step up and a step down to contend with. In addition to that, it's laid on top of existing tile, so I had to grind the glazing off the old tile with a diamond grinder so the new floor would stick. Worth all that sweat? I think so. (You would agree if you saw the old floor.)
 AHHHHH! Wood, how refreshing! This coatrack/hat&gloverack is on the wall above the previously pictured mudroom tile . It is much bigger than it looks.
Wednesday, December 20, 2006


The following pictures are of a bathroom that I tiled. It is all tumbled marble, and a lovely sea green that reminds me of the Mediterranean. If ancient Greece had indoor plumbing, this would have been what it may have looked like...

 The shower has a skylight in it, and the whole thing is site-built. River rock line the floor, and there is a inset shelf for shampoo, ect. All the grout is an epoxy grout that is waterproof and will never stain. The shower is 48"X48", roughly.

 Here you can see into the skylight hole. That must be cool to see while showering, huh?
 Here you can see the river rock on the floor. The floor is sloped and waterproofed by me, and drains just like a store bought floor. It's very tedious, but the end result is worth all that hard work, I think.
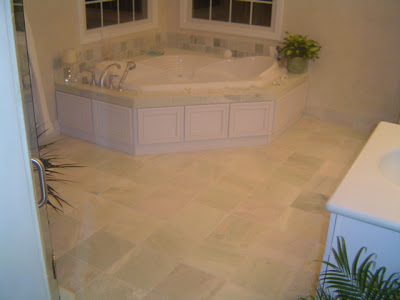 The bathroom floor is 12X12 tumbled marble, with radiant heat underneath. Waking up to warm toes is a thing of beauty.

Another shot of the floor. The homeowners did a wonderful job picking the tiles, paint, and even adding the plants as a finishing touch. Congratulations on a lovely project, you two. You know who you are...!

 The shower has a skylight in it, and the whole thing is site-built. River rock line the floor, and there is a inset shelf for shampoo, ect. All the grout is an epoxy grout that is waterproof and will never stain. The shower is 48"X48", roughly.
 Here you can see into the skylight hole. That must be cool to see while showering, huh?
 Here you can see the river rock on the floor. The floor is sloped and waterproofed by me, and drains just like a store bought floor. It's very tedious, but the end result is worth all that hard work, I think.
 The bathroom floor is 12X12 tumbled marble, with radiant heat underneath. Waking up to warm toes is a thing of beauty.
Another shot of the floor. The homeowners did a wonderful job picking the tiles, paint, and even adding the plants as a finishing touch. Congratulations on a lovely project, you two. You know who you are...!
Subscribe to:
Posts (Atom)